Troubleshooting
Garbage Disposal Hums But Won't Grind (Quick DIY Fix)
Affiliate disclosure: some links on this page go to Amazon, and we may earn a commission if you buy through them. That never changes the repair advice below or the order we recommend the steps in. Details.
This is the most repairable failure a disposal has, and the one where impatience does the most damage.
Cut the power twice
Flip the wall switch off, then unplug the disposal or switch off its breaker in the panel. Do both. A disposal plugged into a switched outlet can be started by anyone who walks past that switch, and the lugs inside the chamber are sharp. Never put a hand or fingers through the drain opening, even with the power off — use tongs or long needle-nose pliers and keep them there until the job is finished.
A hum is the motor telling you it is alive
A disposal motor is a small AC induction motor. When it gets power but the shaft cannot rotate, the windings still energize and the rotor sits still, so the whole housing vibrates at the frequency of the current. That vibration is the sound you are hearing. Nothing inside the motor has burned out yet.
Read the hum as three pieces of good news: the breaker is on, the switch is closing, and the windings are not open. The fault is mechanical — something between the flywheel and the grind ring is holding the rotor still, and the overload has probably already tripped.
If your unit makes no sound at all, the problem is power, not a jam: start with the no-power diagnosis instead.
| What you hear and see | What it usually means |
|---|---|
| Hums, nothing moves, reset button is popped out | Jam. The overload tripped on the stalled motor. |
| Hums, nothing moves, reset button is still set | Jam, or a start circuit that has failed. |
| Hums for a few seconds, then clicks off | The thermal overload is doing its job. Stop restarting it. |
| No sound, reset button popped out | Likely a jam that already tripped, but verify power first. |
| No sound, reset button set | Power is not reaching the unit. Different guide. |
| Spins and grinds, but loudly | Worn grind components or a foreign object, not a stuck flywheel. |
Freeing a stuck flywheel, step by step
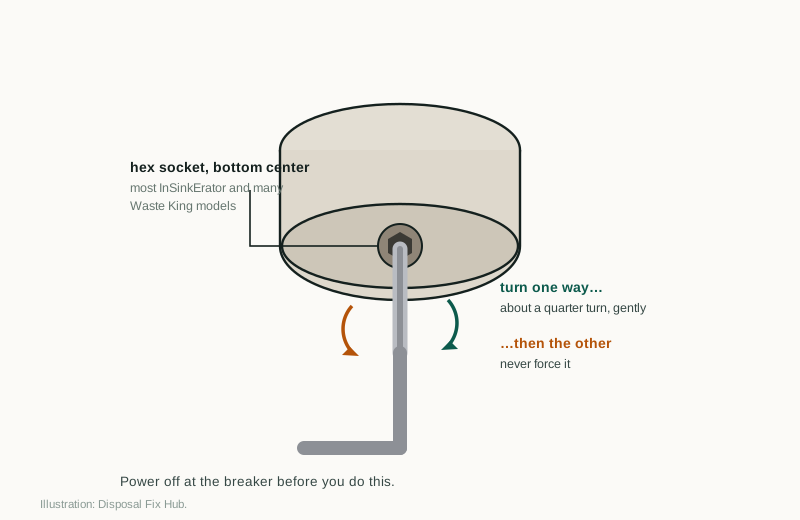
Allow fifteen minutes. You need a flashlight, tongs or long pliers, a 1/4 in hex wrench (5/16 in on some models), and a towel under the cabinet.
-
Confirm the power is really off
Switch off at the wall, then unplug the cord or trip the breaker. If the unit is hardwired, the breaker is your only disconnect, so tell everyone in the house to leave it alone.
-
Look into the chamber before you dig
Shine the flashlight past the splash guard. You are looking for a spoon handle, a bottle cap, a piece of bone, or a mat of peels wedged against the lugs. Seeing the obstruction first keeps you from pushing it deeper into the grind ring.
-
Lift the obstruction out with tongs
Grip it, twist slightly to break the suction of packed food, and pull straight up. Fibrous material often comes out in pieces, so keep going until the chamber is empty. This is the step that actually clears most jams.
-
Rock the flywheel from below
Insert the hex wrench into the socket at the bottom center and turn it a quarter turn one way, then a quarter turn back. Keep rocking rather than cranking in one direction. Do not force it past a hard stop. Most flywheels break loose within two or three rocks once the food pack lets go.
-
Press the reset button once
The button is red or black, on the bottom or lower side of the housing near the cord. Press it firmly until it clicks. If it will not stay in, or pops straight back out, the flywheel is still loaded. Go back to the chamber instead of pressing it again. Reset button location and use covers the variations between models.
-
Test with cold water, not hot
Run cold water, flip the switch, and listen for two seconds. A healthy start is a quick spin and a settling hum. If you hear the stuck hum again, shut it off rather than letting the motor strain.
It still hums, but the flywheel turns by hand
If the wrench turns the flywheel easily in both directions and the chamber is clear, the mechanical side is finished and the unit should start. When it hums and never picks up speed, the fault is in the motor circuit: a start switch that no longer closes, a failed start capacitor on models that use one, or an open winding.
Those parts sit inside a sealed housing and are not sold as homeowner parts. The honest answer is that the unit is finished and a replacement is the practical fix. Confirm before you buy: the outlet is live, the reset is set, and the switch clicks. A repair-versus-replace comparison will show you that a new unit usually costs less than the service call.
A partly cleared jam can feel similar. If the flywheel moves but catches at one spot, the grind ring or flywheel is damaged; metallic grinding after the chamber is empty belongs in the noise diagnosis.
Five mistakes that turn a cheap fix into a new disposal
- Flipping the switch over and over. A stalled motor draws several times its normal current, so every attempt heats the windings. A few rounds can cook a motor that was never broken.
- Forcing the wrench. If it will not move a quarter turn, something is still jammed. A bent Allen key is annoying. A cracked socket or a bent flywheel means you are shopping for a disposal.
- Working with the power on. The wall switch is a control, not a lockout. Someone else in the house can undo it in half a second.
- Using hot water to flush it. Hot water melts grease, which then coats the cooler pipe downstream and hardens there. Cold water keeps fats solid and carries them out of the trap.
- Pouring in chemical drain cleaner. It cannot dissolve a bone or a peel, it attacks rubber seals, and it can splash back later. Mechanical clearing is safer.
Common mistake
Pressing reset without clearing the flywheel does nothing useful: the overload resets, the motor stalls again, and the cycle repeats. Clear the obstruction, then reset once.
When the unit is actually done
- The flywheel will not move a quarter turn in either direction after the chamber is clear.
- It hums with a flywheel that turns freely, which points to the start circuit inside the sealed housing.
- The reset pops within seconds of every start, even with a light load.
- Water shows up at the bottom of the housing. That is the internal seal, and it is not a repair.
- Metallic grinding continues after the chamber is empty.
- The unit is ten years old or more and this is the second failure this season.
For a like-for-like swap, check the mount first: Badger and Evolution use Quick Lock, and Waste King Legend uses EZ Mount, and these mount designs do not interchange without an adapter. Check exact model compatibility and inspect the existing hardware before reusing it. Our Badger notes and the installation walkthrough cover what to expect.
Keeping the flywheel free
Most jams are a loading problem, not a hardware problem. Feed the unit a handful at a time instead of a full sink of scraps, and let the cold water run before, during, and for about fifteen seconds after the last piece. Keep fibrous peels, large bones, fruit pits, seafood shells, and big batches of potato peels out of it, as described in what can and cannot go down a disposal.
Run the disposal once a week even if you barely use it. A unit that sits idle for months can seize at the shaft, which produces the same hum with no obstruction at all.
FAQ
Can I keep pressing the reset button until it finally starts?
No. Each press repeats the stall and adds heat. Clear the chamber and free the flywheel, then press the button once. A button that pops out immediately means the jam is still there.
What if my disposal has no hex socket underneath?
Some models do not have one. The only access is then from above, so work slowly with tongs and a flashlight. If the flywheel still will not move, the unit has to come off the mount, and replacement is usually the better use of an afternoon.
How long should I run the water after grinding?
About fifteen seconds of cold water after the last scrap. That flushes the trap and keeps food from settling in the pipe, where it sours or clogs later.
Does a humming disposal always mean I need a new one?
No. Most humming units are jammed, and a jam is a wrench-and-tongs job. Replacement enters the conversation only when the flywheel turns freely and the motor still will not start.
Parts and tools mentioned
Affiliate links · price ranges are approximate street prices
1/4 in hex jam wrench
The tool the manufacturer intends you to use. A standard 1/4 in Allen key works on most InSinkErator units; a dedicated disposal wrench is longer and easier on your knuckles.
InSinkErator Badger 5 (1/2 HP)
A direct swap for many older Badger units if the motor is seized and the flywheel will not turn in either direction.
Extra-long needle-nose pliers
For lifting an obstruction out of the grind chamber without putting a hand in. Long handles keep your fingers clear of the opening.
If you buy through a link on this page, Disposal Fix Hub may earn a small commission at no extra cost to you. We link to parts and units we would use ourselves, and the repair steps above work whether or not you buy anything. Read the full disclosure.
Sources & review notes
Review focus: power isolation, the hex-socket check, and the difference between a jam and a motor that hums while the flywheel turns freely.