Maintenance & Cleaning
How to Install a Garbage Disposal (Step by Step)
Affiliate disclosure: some links on this page go to Amazon, and we may earn a commission if you buy through them. That never changes the repair advice below or the order we recommend the steps in. Details.
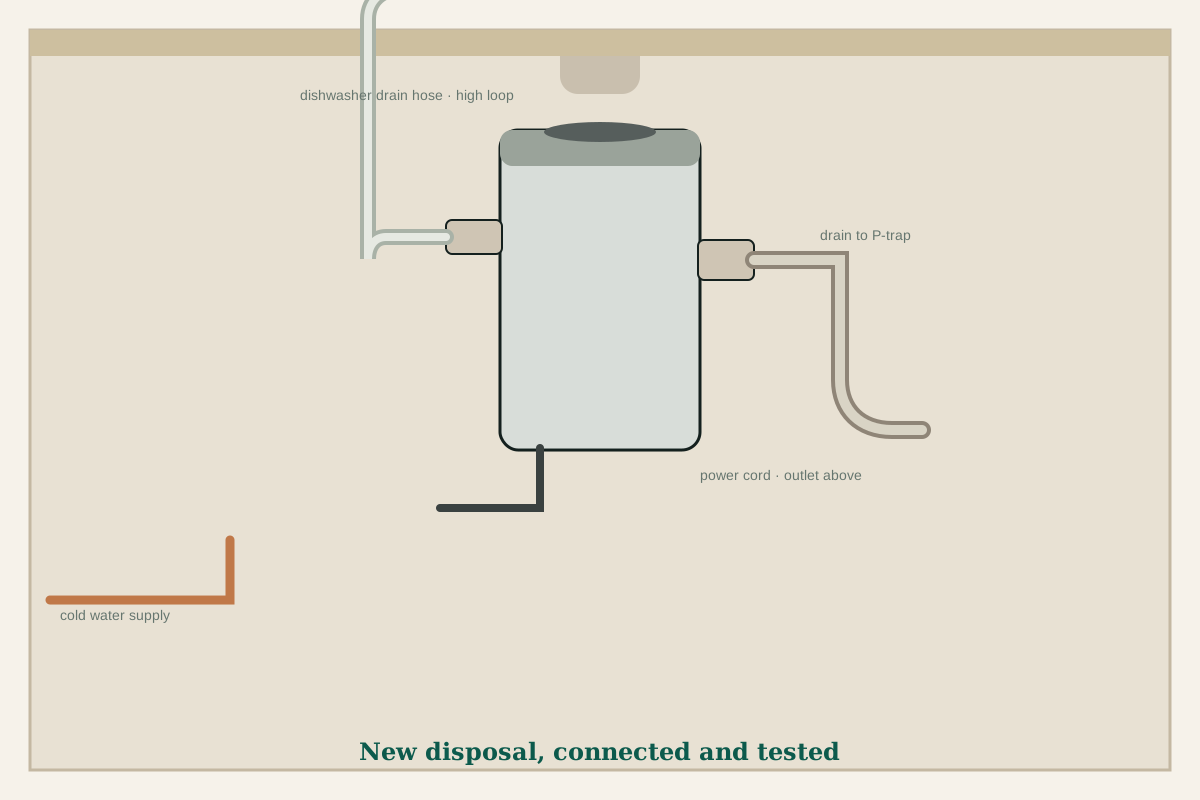
A disposal install is plumbing plus a little electrical work. Neither part is difficult, but both punish skipped steps — usually with a leak you find a week later or a dishwasher that will not drain.
Before you buy
- Measure the sink opening and confirm yours before ordering.
- Identify the existing mount: three-bolt on some other models, Quick Lock (Badger and Evolution), or EZ Mount (Waste King Legend). Confirm exact model compatibility and inspect the existing hardware before reusing a mount.
- Check the cabinet for room. Measure the depth and the width to the nearest obstruction.
- Confirm the electrical: is there a dedicated circuit, a GFCI outlet, and a cord, or is the old unit hardwired?
- Check whether the new unit includes a power cord. Many do not, and the old cord usually will not transfer.
- Confirm the dishwasher connection and whether the old hose and clamp are reusable.
- Have a helper available for the lift, or a box the exact height of the cabinet floor to rest the unit on.
Time and difficulty
| Situation | Typical time | Difficulty | Who should do it |
|---|---|---|---|
| Like-for-like swap, same mount, cord and outlet already in place | 1–2 hours | Moderate | Most homeowners, with a helper |
| New unit in a different mount family, or first install | 2–4 hours | Moderate to hard | Experienced DIY, with a helper |
| Hardwired unit, no cord, or no existing outlet under the sink | A day, plus inspection | Hard | Licensed electrician for the circuit; plumber or DIY for the rest |
Tools and materials
Most of this is standard hand-tool kit. The basin wrench is the one item people do not own and then wish they did, because the drain fittings sit where a normal wrench will not fit.
| Tools | Materials |
|---|---|
| Screwdrivers, adjustable wrench, basin wrench, pliers | New disposal and mounting hardware |
| Wire strippers and a flashlight | Power cord kit, if not included |
| Putty knife or plastic scraper | Plumber's putty or silicone |
| Bucket, towels, gloves | Dishwasher hose clamp and, if needed, a new hose |
| Small hammer | Wire nuts and a cable clamp or strain relief |
Safety first
Kill the breaker before you touch the wiring, and unplug the old unit if it has a cord. Confirm the circuit is dead with a tester rather than trusting the panel label. A disposal is heavy, the cabinet is cramped, and the trap holds standing water — wear gloves, and do not try to hold the unit with one hand while you work a wrench with the other.
Electrical requirements
A disposal needs a dedicated 15–20 amp circuit. "Dedicated" means the disposal is the only load on that circuit, which is why a disposal and a dishwasher usually do not share one. It should have GFCI protection; most current codes call for it in kitchens.
Most new units are cord-and-plug: a short cord goes into an outlet under the sink, often a switched outlet controlled by the wall switch. The cord is frequently sold separately, so check the box before you start. Hardwired units connect through a junction box with a cable clamp and wire nuts; if there is no box, or the wiring is aluminum, call an electrician.
Do not run the disposal from an extension cord or a power strip. A motor that starts under load draws a surge, and a marginal circuit produces nuisance trips that look like disposal failures.
Removing the old unit
-
Disconnect power and drain
Kill the breaker, unplug the cord, and put a bucket under the trap. Loosen the slip nuts on the drain outlet and let the trap empty. If a dishwasher hose is connected, release the clamp and lift the hose end above the disposal so it does not siphon.
-
Support the weight
Put a box or a stool at cabinet-floor height directly under the unit, or have a helper hold it. The moment the mount releases, the entire weight is on the plumbing and your wrist.
-
Release the mount
On a three-bolt mount, loosen the three bolts. On Quick Lock and EZ Mount, twist the unit free. If the mount is rusted solid, stop and cut it loose or replace the whole assembly rather than prying on the sink.
-
Lift it out and clean up
Tip the old unit into the bucket, not onto the cabinet floor. Scrape the old putty off the sink opening and inspect the rim for cracks.
Mounting the flange
Roll a rope of plumber's putty about the thickness of a pencil and press it under the flange lip, or use silicone on a composite sink. Push the flange into the opening and center it. From below, install the gasket, the fiber washer, and the mount in the order the instructions show — getting this order wrong is a guaranteed leak.
Tighten the mount from below, alternating around the circle, until the putty is compressed into a ring. Wipe the excess from above before it sets.
Hanging the disposal
Most mounts work the same way: the unit has tabs or a collar that engages the mount, and you rotate it to lock. Support the weight with your shoulder or a helper while you line up the tabs, then twist. Do not hang the unit from the drain pipe, and do not force the twist — if it will not engage, the mount and the unit are mismatched.
Once it is hanging, check that it sits level. A tilted disposal strains the drain connection and is a common source of a slow drip at the slip nut.
Drain and dishwasher connections
Connect the drain outlet to the trap with the flange washer in place and tighten the slip nut hand-tight plus a small turn. Do not cross-thread it; plastic nuts go on easily when aligned and fight you when they are not.
If a dishwasher drains into the disposal, the inlet on the side of the housing has a knockout plug inside it. That plug must be removed before the hose goes on. Use a screwdriver and a small hammer to drive it out, and angle the housing so the plug falls into a cup rather than into the grind chamber. A disposal with the plug still in place will stop the dishwasher from draining, and it is the most common install mistake.
Clamp the hose to the inlet, then create a high loop: run the hose up so its highest point is about 20 inches above the cabinet floor, or use an air gap if your sink has one. The loop keeps dirty dishwasher water from siphoning back into the appliance. Secure the loop with a clip so it does not sag over time. The dishwasher guide covers what to check if it still will not drain.
Wiring the cord
If you are installing a cord kit, feed the cord through the strain relief first, then strip about half an inch of insulation from each conductor. Match black to black, white to white, and green or bare copper to the grounding screw or green lead. Twist the wire nuts on firmly and tug each connection to confirm it is mechanically sound.
Tighten the strain relief so the cord cannot be pulled out of the housing, replace the cover plate, and plug into the GFCI outlet. If the old cord is long enough but has a damaged jacket, replace it — a cord is cheaper than a fire.
Water test and leak check
Before you put anything down the drain, run cold water through the sink for a minute and watch four places: the flange at the sink opening, the drain slip nut, the dishwasher inlet, and the bottom of the housing. Dry everything first so any new moisture is obvious.
Then run the disposal with a small amount of soft food and cold water. Listen for a normal grind. Run the dishwasher through a short cycle and check the inlet for drips. Look again the next day, since a slow flange leak often shows up overnight.
Common install mistakes
- Leaving the dishwasher knockout plug in place, so the dishwasher will not drain.
- Skipping the high loop, which lets sink water back into the dishwasher.
- Using the old putty or an old gasket instead of a fresh seal.
- Tightening the mount unevenly and cracking a thin sink.
- Reusing a cord that is too short, damaged, or not rated for the unit.
- Installing a different mount family without an adapter.
When to hire a plumber or electrician
Call an electrician if there is no dedicated circuit, the wiring is aluminum, the unit must be hardwired and there is no junction box, or the panel is full. Call a plumber if the drain piping is corroded or undersized, the sink opening is cracked, or the cabinet has been modified in a way that makes the mount impossible to seat.
Hire out the whole job if you are not comfortable working inside a live panel or lifting a heavy unit in a cramped cabinet. If you are unsure whether the old unit is worth replacing, this comparison and the buying guide will help.
FAQ
Does a new garbage disposal come with a power cord?
Often not. Many units are sold as cord-and-plug models but ship without the cord, and hardwired models never include one. Check the listing or the box before you start, because the old cord usually will not fit the new unit.
Can I replace a Badger with an Evolution unit?
Possibly. Current Badger and Evolution models both use Quick Lock, but confirm the exact models are compatible and inspect the existing hardware before reusing the mount. If it is worn, damaged, or not listed as compatible, replace the mounting assembly along with the unit.
Why is my dishwasher not draining after a new install?
The knockout plug inside the disposal's dishwasher inlet is probably still in place, or the drain hose has no high loop. Both are installation issues, not appliance failures.
Parts and tools mentioned
Affiliate links · price ranges are approximate street prices
InSinkErator Badger 5 (1/2 HP)
A straightforward continuous-feed unit for a typical household. Most installs need only basic hand tools.
Waste King Legend L-2600 (3/4 HP)
More power for the same footprint, with a stainless steel grind chamber and a pre-installed power cord on most listings.
If you buy through a link on this page, Disposal Fix Hub may earn a small commission at no extra cost to you. We link to parts and units we would use ourselves, and the repair steps above work whether or not you buy anything. Read the full disclosure.
Sources & review notes
Review focus: mounting, dishwasher knockout, drain alignment, and electrical instructions must match the exact replacement model.